It’s no secret that Advanced WordPress Security Guide is a huge topic for website owners, and it’s important to keep up with the latest best practices. Unfortunately, Google blacklists around 10K+ sites every day due to malware/phishing issues with WordPress core software being very secure – however, there are still plenty of things you can do!
This post will go over all the top tips so that your site remains safe from hackers & scams. The steps are for DIY users who like to secure their WordPress website by hand and also like some coding.
You can follow the basic steps of the WordPress Beginner Security guide here. Where we discuss core security, Security plugins installation, SSL Certificate Installation, and more.
Step by step Advanced WordPress Security Guide for DIY users
If you are up to date on your WordPress security, congratulations. But there is still more you can do! Some of these steps require coding knowledge, but they will all help fortify your site even further and prevent other issues from popping up in the future.
We are going to follow up on the security below:
- Change the Default “admin” username
- Disable File Editing
- Disable PHP File Execution
- Limit Login Attempts
- Enable Two Factor Authentication (2FA)
- Change WordPress Database Prefix
- Password Protect WP-Admin and Login
- Disable Directory Indexing and Browsing
- Disable XML-RPC in WordPress
- Add Security Questions to WordPress Login
- Scanning WordPress for Malware and Vulnerabilities
Change the Default “admin” username
This step is pretty obvious, but that doesn’t make it unimportant. The default admin username has long been a favorite for hackers to gain access to WordPress websites. If your Administrator’s name is not admin then ok. Just hide the user name. And If the user name is “admin” then, follow these steps:
Log into your website’s WordPress admin area using your regular login information Go to Users by clicking on Appearance > Users from the Dashboard menu At the top of your user’s list, click on “Add New” Fill in a nickname for the user, choose an appropriate role (such as Administrator), and click “Create” to save it.
Login with a new one and delete the old user name. And don’t forget to switch content to the current Administrator
Disable File Editing
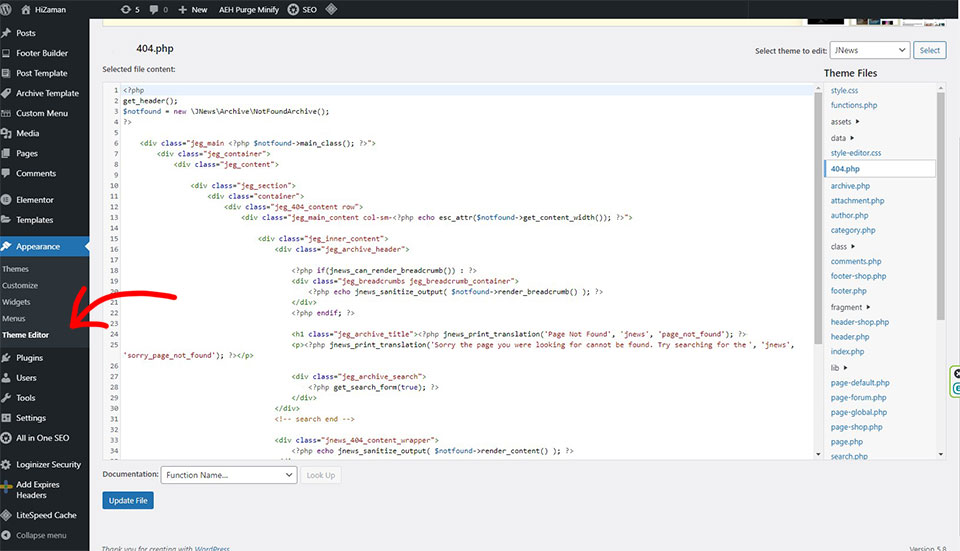
It is possible to edit your WordPress Themes and Plugins files via the wp-admin dashboard. To disable this you just write code in the wp-config.php file.
Open wp-config.php file of your website and paste the following code:
// Code to prevent file editing from wp-admin Dashboard
define( 'DISALLOW_FILE_EDIT', true );
Stop PHP File Execution
This step will help you to disable PHP execution for external files and include. This is a security measure that helps prevent malicious users from making calls directly to your site files via the web server’s PHP interpreter.
To do this, add the following lines of code in the .htaccess file. You can read this article on how to edit WP .htaccess file.
<Files *.php>
deny from all
</Files>
Limit Login Attempts
One of the best WordPress Security Tips is to limit login attempts so hackers can’t keep trying different usernames/passwords until they guess yours correctly. This plugin makes this very easy! Install it, activate it, and use its simple interface to enter how many times someone can try to login in a given period. After they hit the limit, their IP address will be blocked from logging in for a predefined amount of time (or indefinitely).
As we suggest using the Login LockDown plugin to limit Login Attempts. After install and active go Settings> Login LockDown and update the values for Max Login Retries, Retry period Restriction, etc. Or keep it default as it is.
Disable Directory Indexing and Browsing
By default, WordPress will try to display a directory listing of your files if someone tries to surf through the folders on your web server. This is not good because it easily allows hackers to see what is in your directories and where popular files might be located (like wp-config.php).
To disable this feature, add the following line of code to your .htaccess file:
Options -Indexesif you can’t see the .htaccess file then in file explorer settings checkmark the “show hidden file”. Still, .htaccess file missing? Follow the .htacess file creation guide here.
Disable XML-RPC in WordPress
This step will help you to disable XML-RPC which is a built-in WordPress feature and used for Blogs that are connected with third-party services like Disqus. This plugin protects you from DoS attacks by disabling this function.
in your .htacess file just paste the code below
# The code to Block xmlrpc.php request
<Files xmlrpc.php>
order deny,
allow
deny from
allallow from 123.123.123.123
</Files>
Add Security Questions to WordPress Login
All top WordPress security tips are recommending adding some extra security questions to your account than just your login password. You can get this done by adding a security question plugin called wp Security question.
Disable PHP Error Reporting
This step will help you to disable PHP error reporting. By default, this feature is enabled in WordPress which allows remote websites to access errors that occur on your site.
This might sound like a good idea but anyone with malicious intentions can find out about weak spots in your code or security flaws using these reports so it’s best to turn them off. You can do that by adding the following line of code into the wp-config.php file:
define('WP_DEBUG', false);If you already have WP_DEBUG enabled they recommend changing it back to true temporarily while you scan your website for problems. WP_DEBUG is set to false by default in the latest version of WordPress.
Enable Two Factor Authentication (2FA)
Two factor authentication (also known as 2FA) is an extra layer of security that requires something you know (your password) and something you have (e.g. your phone/tablet/laptop). When logging in to WordPress, a code will be sent via email or from an app such as Google Authenticator or Authy which must be entered before access is granted. This ensures even if someone has stolen your login details they still can’t get in because they need that special code to unlock the account first.
To use this security you have to install a 2fa plugin as we suggest Two Factor Authentication. Install the plugins and set up Google Authenticator, Authy, or other methods you like most.
Logout inactive users automatically
To improve the security of your WordPress site, you can implement a session timeout that automatically logs out inactive users. This is beneficial in situations where an authorized user may have wandered away from their screen. Additionally, it will help to prevent unauthorized access if someone else tries to hijack that person’s account or change passwords and make changes without authorization.
Just install a plugin called Inactive Logout plugin to make this happen. Install and set the duration of the logged-in time. and also add a message which will display after the end of the session.
Scanning WordPress for Malware and Vulnerabilities
You should scan your site regularly with free tools such as Sucuri SiteCheck to make sure that it is free from malware, hacked files, blacklisting or other issues. Once the malware scan is complete you will be given tips on how to clean up any infections which were found.
You can also use WordFence and SiteLock for a more detailed security analysis along with malware removal capabilities.
Conclusion
It’s pretty obvious that securing your website doesn’t have to be an overwhelming task even with the most complex of sites. If you follow these top WordPress security tips, you should be more than safe on the Internet and keep hackers away from your site.
Security is a continuous process, so you have to follow these steps regularly. Nobody can 100% ensure the security of their website, you have to do the best job to keep your website safe.


